Have you ever wondered how video calling apps like Google Meet, Zoom, or Discord work? Or how multiplayer games achieve real-time communication between players? The answer lies in a powerful technology called WebRTC (Web Real-Time Communication).
In this guide, we'll take you from knowing nothing about WebRTC to having enough knowledge to build your own real-time communication projects. Let's dive in!
What is WebRTC?
WebRTC stands for Web Real-Time Communication. It's an open-source technology that enables real-time audio, video, and data sharing directly between web browsers and mobile applications without needing any plugins or third-party software.
Here's the key difference:
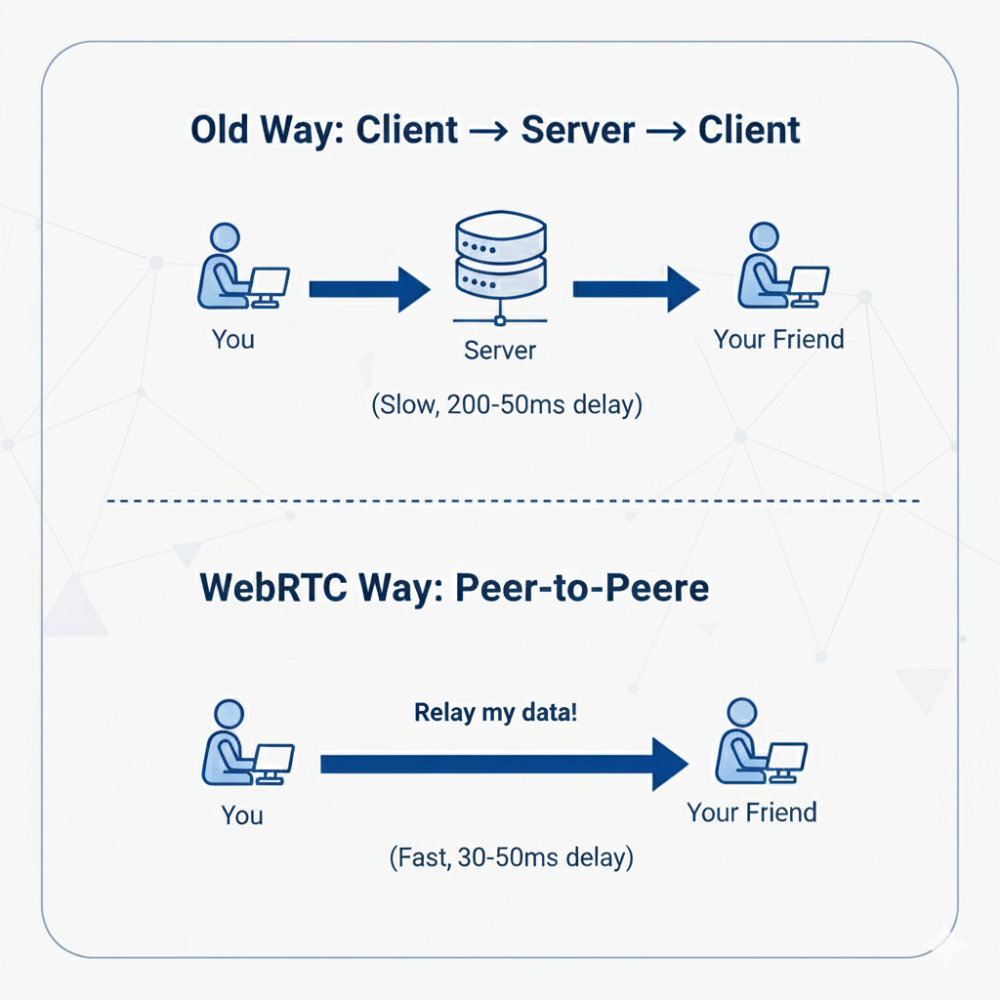
Your browser connects directly to your friend's browser. No middleman. That's why modern video calls feel responsive.
The Main Problem: Network Address Translation (NAT)
If direct connections are so great, why isn't everything built this way? Because of something called NAT.
Think of it like this: You're in a big apartment building. Your apartment number is 304, but people outside only see the building's street address. They can't directly reach apartment 304 without going through the building's lobby first.
That's exactly how the internet works. Your device has a private address (like 192.168.1.15), but the internet only sees your router's public address (like 23.45.67.89).
When you want to video call someone, you need their router's public address AND which specific "apartment" (port) to connect to. But how do you find that out?

The Solution: Three Simple Tools (STUN, TURN, ICE)
WebRTC uses three tools to solve this problem.
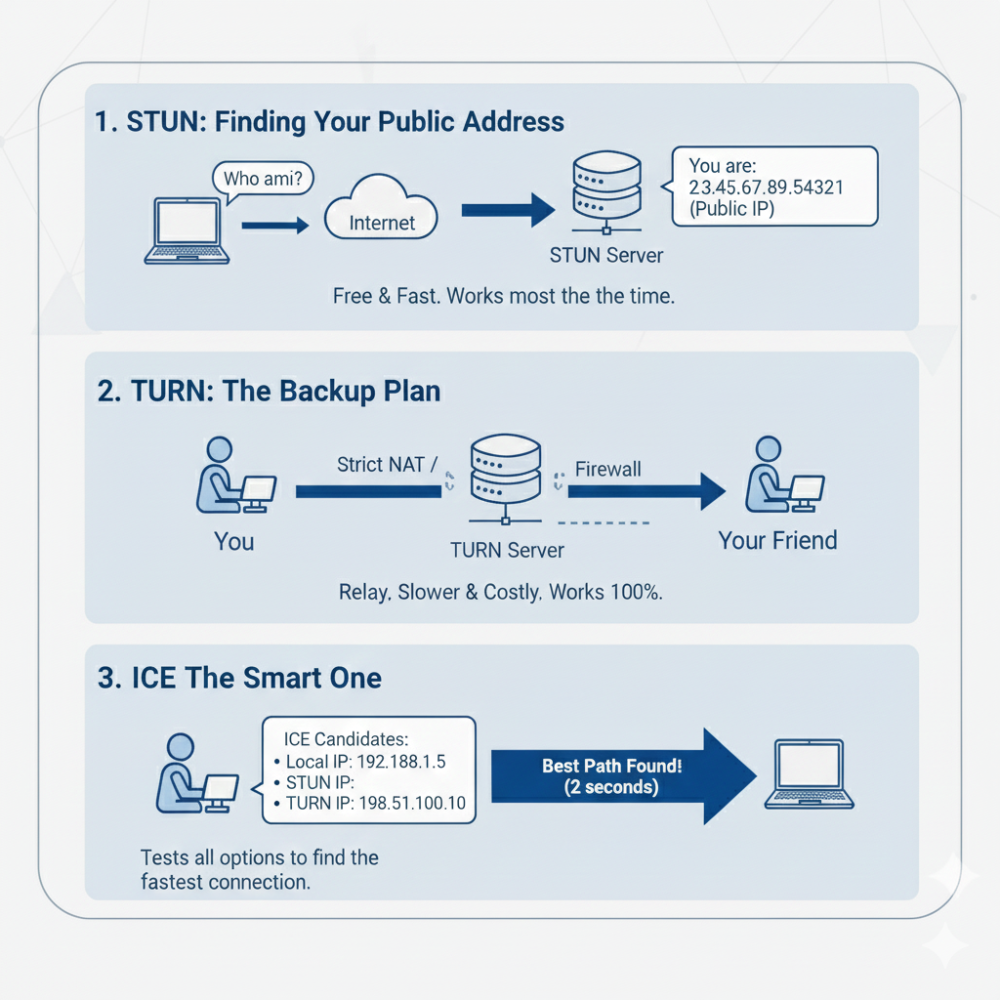
STUN: Finding Your Public Address
STUN is like asking someone on the internet, "Hey, what's my address from your perspective?"
Your browser asks a STUN server, and it replies: "From where I'm sitting, you're at 23.45.67.89:54321"
That's it. STUN servers are free and simple. Google even provides public ones you can use.
TURN: The Backup Plan
Sometimes you're behind a really strict firewall (like at work). When that happens, a direct connection is impossible.
TURN acts as a relay. Instead of connecting directly, your video goes: You → TURN Server → Your Friend.
It's slower and expensive to run, but it works 100% of the time. This is why some video calling services cost money.
ICE: The Smart One
ICE is the manager that tries everything. It collects all possible ways to connect:
- Your local address (if you're on the same WiFi)
- Your public address (from STUN)
- The relay address (from TURN)
Then it sends this list to the other person and tests each option until it finds what works best. Usually takes 1-2 seconds.
The Capability Card: Session Description Protocol (SDP)
Before connecting, browsers need to tell each other what they support. That's what SDP does.
Think of it as a business card that says:
- "I can do video and audio"
- "I can use these video formats: VP8, H.264"
- "Here's my encryption key"
- "Here are my possible addresses"
WebRTC generates this automatically. You never write it by hand.
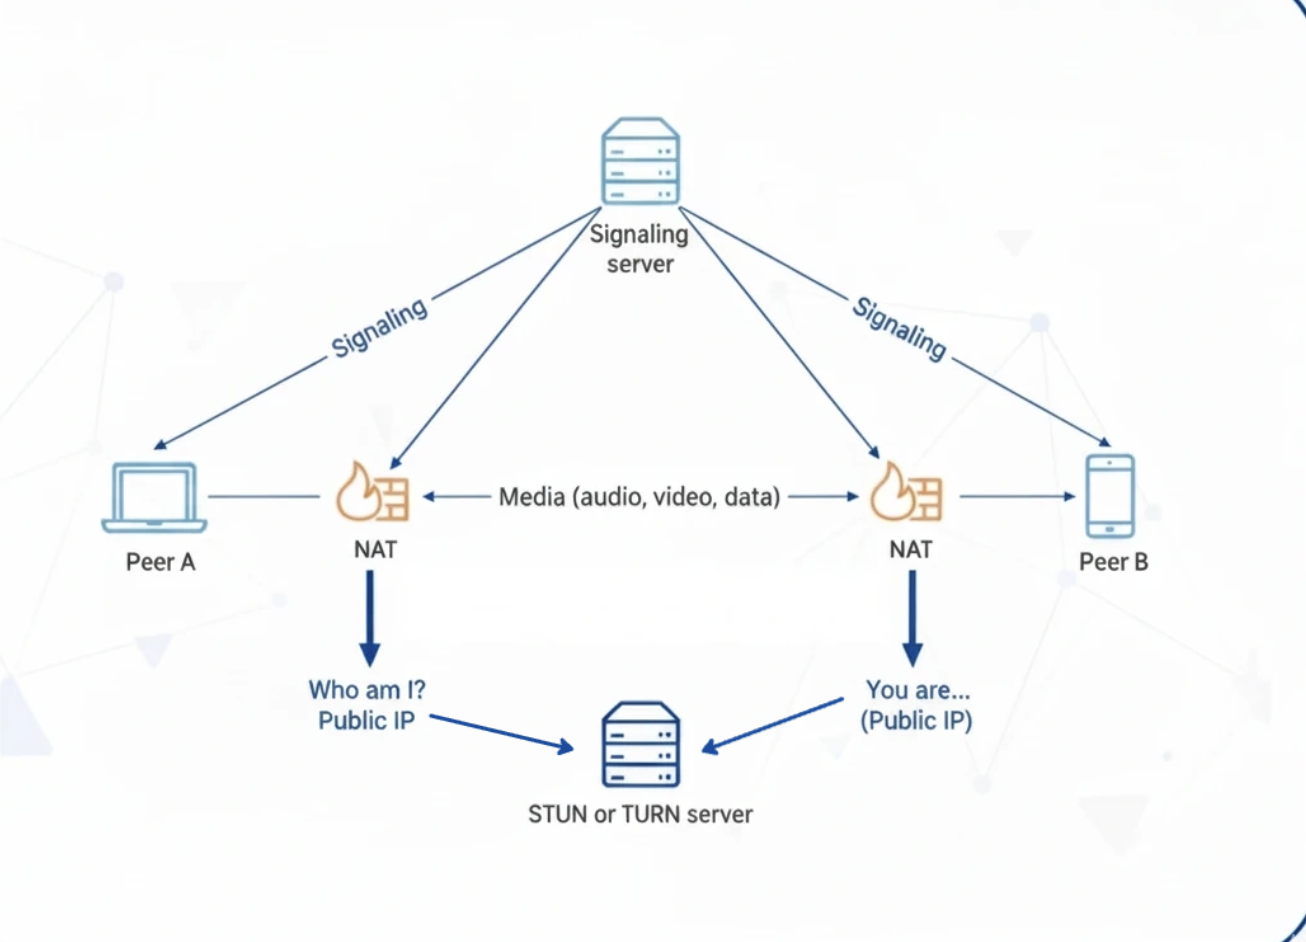
The Missing Piece: Signaling
Here's what every tutorial skips: WebRTC doesn't handle the initial setup. You need another way to exchange those "business cards" (SDPs).
It's like this: You can't text someone until you have their phone number. But how do you get their phone number in the first place? Usually someone gives it to you, or you meet in person first.
That's signaling. You need an external channel (WebSocket, Socket.io, even email) to exchange the setup information. Once that's done, the browsers connect directly and the signaling channel isn't needed anymore.
The Code: How It Actually Works
Let me show you the actual steps. I'll explain every part.
Step 1: Set Up the Connection
// Tell WebRTC which STUN server to use (we'll use Google's free ones)
const configuration = {
  iceServers: [
    { urls: 'stun:stun.l.google.com:19302' }
  ]
};

// Create the connection object
const peerConnection = new RTCPeerConnection(configuration);
This sets up the connection and tells it where to ask "what's my public address?"
Step 2: User A Creates an Offer
async function makeCall() {
  // Create the offer (my capabilities and addresses)
  const offer = await peerConnection.createOffer();

  // Save it locally (this starts finding connection paths)
  await peerConnection.setLocalDescription(offer);

  // Send this to User B through your signaling method
  // (could be WebSocket, Socket.io, whatever you choose)
  signalingServer.send({ type: 'offer', sdp: offer.sdp });
}
User A is basically saying "here's what I can do, and here's where you can reach me."
Step 3: User B Receives and Answers
async function handleOffer(offer) {
  // Save User A's info
  await peerConnection.setRemoteDescription(
    new RTCSessionDescription(offer)
  );

  // Create my answer
  const answer = await peerConnection.createAnswer();

  // Save my answer
  await peerConnection.setLocalDescription(answer);

  // Send it back to User A
  signalingServer.send({ type: 'answer', sdp: answer.sdp });
}
User B is saying "got it, here's what I can do on my end."
Step 4: User A Completes the Connection
async function handleAnswer(answer) {
  // Save User B's info
  await peerConnection.setRemoteDescription(
    new RTCSessionDescription(answer)
  );

  // Done! Browsers are now connected directly
}
Step 5: Share Connection Paths
As browsers discover ways to connect, they share them:
// When we find a path, send it
peerConnection.onicecandidate = (event) => {
  if (event.candidate) {
    signalingServer.send({
      type: 'ice-candidate',
      candidate: event.candidate
    });
  }
};

// When we receive a path, add it
function handleIceCandidate(candidate) {
  peerConnection.addIceCandidate(new RTCIceCandidate(candidate));
}
Step 6: Add Video and Audio
// Get camera and microphone
const stream = await navigator.mediaDevices.getUserMedia({
  video: true,
  audio: true
});

// Add them to the connection
stream.getTracks().forEach(track => {
  peerConnection.addTrack(track, stream);
});

// Show local video
document.getElementById('localVideo').srcObject = stream;

// Receive and show remote video
peerConnection.ontrack = (event) => {
  document.getElementById('remoteVideo').srcObject = event.streams[0];
};
What Happens When Alice Calls Bob
Let me walk you through the actual sequence:
- Alice clicks "Call Bob"
- Her browser creates an offer and sends it through the signaling server
- Bob receives the offer and creates an answer
- Bob sends the answer back through the signaling server
- While this happens, both browsers are discovering connection paths
- They exchange those paths
- They test the paths and pick the best one
- Connection established, video starts flowing directly between them
The signaling server is only used for the setup. After that, it's peer-to-peer.
Total time: usually 1-3 seconds.
The Pros and Cons
What's Great: Works natively in all modern browsers. No plugins, no downloads. The latency is incredibly low, which is why it's used for gaming and live trading apps. It's also a web standard, so it's not going anywhere.
The Challenges: You need to run servers (signaling server, and ideally TURN for reliability). That costs money and adds complexity. Also, pure peer-to-peer doesn't scale well. With 4 people on a call, everyone maintains 3 connections. With 10 people, everyone maintains 9 connections. Your computer can't handle that.
For larger meetings, you need a media server (called an SFU) that receives one stream from each person and redistributes it. That's what Zoom and Google Meet actually use for big meetings.
Conclusion
WebRTC boils down to three steps: find your public address with STUN, create an offer describing your capabilities, and exchange it with another browser. All the complexity around NAT, ICE candidates, and SDP exists to solve one problem — getting two browsers behind routers to talk directly. Now put it into practice: build a simple screen sharing tool. Use the code examples above, swap getUserMedia() for getDisplayMedia(), add a basic WebSocket server for signaling, and you'll have a working prototype in an afternoon. Once you see your screen appearing in another browser with near-zero latency, WebRTC will click. That's the same technology powering Zoom and Google Meet.